
Why You’ll Love this Orange Buttermilk Cake Recipe
If you’re looking for a delightful dessert that bursts with flavor, this Orange Buttermilk Cake is a must-try.
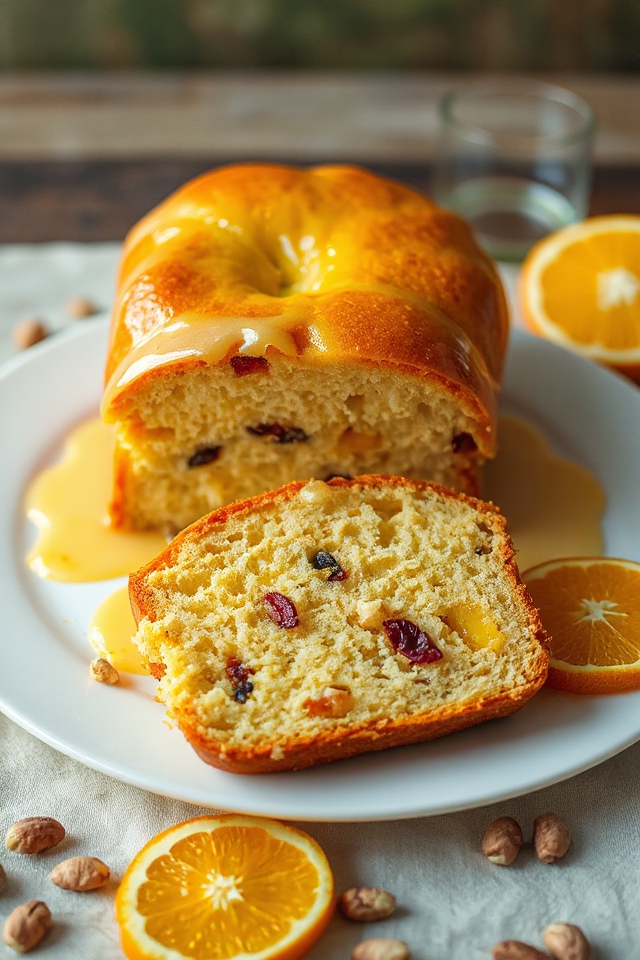
I absolutely adore how the sweet and tangy orange blends beautifully with the rich, moist texture of the cake. Each bite feels like a warm hug, thanks to the buttermilk that keeps it tender.
The added crunch of toasted macadamia nuts brings a delightful contrast, while the tropical fruit adds a fun twist. Plus, the citrus glaze drizzled on top is simply irresistible.
Trust me, this cake isn’t just a treat; it’s a celebration on a plate!
Ingredients of Orange Buttermilk Cake
When it comes to baking an unforgettable cake, the right ingredients are key. For this Orange Buttermilk Cake, you’ll need a mix of sweet, tangy, and nutty flavors that come together in a way that makes your taste buds dance.
Picture the zesty orange juice harmonizing with the creamy buttermilk, creating a moist and tender cake that you’ll want to take a second slice of—if you can resist eating the whole thing in one go. Whether you’re baking for a special occasion or just because it’s Tuesday, gathering these ingredients is your first step toward a delicious masterpiece.
Ingredients for Orange Buttermilk Cake:
- 1 cup butter, softened
- 4 cups sugar, divided
- 4 large eggs
- 4 cups all-purpose flour, divided
- 1 teaspoon baking soda
- 1 1/2 cups buttermilk
- 1 (7-ounce) package dried tropical fruit, chopped
- 1 cup chopped macadamia nuts, toasted
- 2 teaspoons grated orange rind
- 1 cup orange juice
Now, before you immerse yourself in the baking process, let’s chat about a few considerations regarding these ingredients.
First, if you can get your hands on fresh oranges, you might consider zesting a few to boost that bright flavor even more.
And for the dried tropical fruit, don’t be afraid to mix things up—think about using a blend of mango, pineapple, and papaya for an exotic flair. Just remember to chop them up small enough so they blend seamlessly into the batter.
Ultimately, toasting the macadamia nuts really amps up their flavor, so don’t skip that step. Trust me, your cake will thank you, and you’ll feel like a baking wizard when those nuts release their nutty aroma in your kitchen.
Happy baking!
How to Make Orange Buttermilk Cake
Making the Orange Buttermilk Cake is like starting a delightful journey that fills your kitchen with warmth and sweet aromas. To begin, grab that 1 cup of softened butter and toss it into your mixing bowl. Using an electric mixer on medium speed, beat the butter until it’s fluffy—think clouds, but tastier.
Once you reach that creamy perfection, it’s time to gradually add in 2 cups of sugar while continuing to beat. This is the moment when your kitchen starts to feel a little magical, isn’t it? Now, crack in the 4 large eggs, one at a time, ensuring you blend well after each addition. You want everything to come together like a cozy team.
Now comes the fun part. In a separate bowl, mix together 3 3/4 cups of all-purpose flour with 1 teaspoon of baking soda. This duo is going to help your cake rise beautifully. You’ll add this flour mixture alternately with 1 1/2 cups of buttermilk to your butter mixture, starting and finishing with the flour.
A little tip: go slow when you mix, especially at first, unless you want flour clouds decorating your kitchen. Once everything is nicely blended, toss the dried tropical fruit (that 7-ounce package you chopped earlier) with the remaining 1/4 cup of flour. This little trick keeps the fruit from sinking to the bottom of your cake.
Add in the toasted macadamia nuts and 2 teaspoons of grated orange rind, and then fold this colorful, fruity mix into your batter.
Pour that gorgeous batter into a greased and floured 10-inch tube pan. It’s like giving your cake a comfy bed to rise in. Bake in a preheated oven at 350 degrees for about 1 hour and 10 minutes. You’ll know it’s done when a long wooden pick inserted in the center comes out clean—no gooey batter sticking to it, please.
While that cake is baking, you can whip up a simple glaze. In a saucepan, bring 1 cup of orange juice and the remaining 2 cups of sugar to a boil, stirring constantly for about a minute.
When your cake is done and slightly cooled, pierce it with a wooden pick and gently run a knife around the edges to loosen it from the pan. Drizzle that fragrant glaze over the warm cake and let it cool in the pan on a wire rack.
Once it’s cool, invert it onto a serving plate and get ready for some serious cake admiration. Enjoy every crumb.
Orange Buttermilk Cake Substitutions & Variations
Exploring substitutions and variations for the Orange Buttermilk Cake can be as exciting as baking it.
If you’re out of buttermilk, you can easily substitute with yogurt or a mix of milk and vinegar. For a different flavor, try swapping the orange juice for lemon or lime juice.
If you prefer a nut-free version, leave out the macadamia nuts and add more dried fruit instead. You could also experiment with different fruits like cranberries or cherries.
Don’t hesitate to adjust the sugar to suit your taste, making this cake uniquely yours while keeping its delicious essence intact!
What to Serve with Orange Buttermilk Cake
After you’ve perfected your Orange Buttermilk Cake, the next step is figuring out what to serve alongside it.
I love pairing it with a light, citrusy whipped cream to enhance the orange flavor. A scoop of vanilla ice cream also works beautifully, offering a creamy contrast.
If you’re feeling adventurous, add fresh berries for a pop of color and tartness. For a more sophisticated touch, a drizzle of chocolate sauce can elevate the cake’s sweetness.
Don’t forget a steaming cup of tea or coffee to round out the experience. These pairings truly make the cake shine!
Additional Tips & Notes
While baking your Orange Buttermilk Cake, keep in mind a few key tips to guarantee the best results. First, use room temperature ingredients; this helps the batter mix smoothly.
Don’t skip the toasting of macadamia nuts; it enhances their flavor immensely. If you prefer a lighter cake, consider sifting the flour before measuring.
Remember to check your cake a few minutes before the recommended baking time, as oven temperatures can vary.
Finally, let the cake cool completely before pouring the glaze for a beautiful finish. Enjoy the delightful flavors of this cake; it’s a real treat!